
Pianora · Sheet music scanning guide
Scan sheet music with better results
A clear, well-framed photo helps Pianora read your notes. Follow these tips when scanning paper scores or importing sheet music images.
Before you scan
- Choose clearly printed sheet music. Handwritten scores may not be recognized accurately.
- Keep the sheet music image upright, not rotated sideways.
- Lay the page flat and photograph it straight on, with your phone parallel to the paper.
- Use even lighting, without shadows or glare.
- Capture one page per image, including all the music.
- Check that small notes and symbols are sharp before continuing.
Prepare your sheet and photo
Prefer printed sheet music
Use a clean score printed from music notation software when possible. Handwritten notes, uneven staff lines and unusual symbols can be harder to distinguish, even in a sharp photo. Better lighting alone may not resolve these difficulties.

IncorrectHandwritten music with uneven notation.CorrectClean printed music with clear symbols. Photograph the page straight on
Hold your phone above the centre of the page, parallel to the paper. Avoid taking the photo from the side: perspective can compress the staves and distort the notes.

IncorrectAn angled photo distorts the staves.CorrectStraight-on photo, phone parallel to the paper. Keep the score image upright
Check the resulting photo: the score must be upright in its normal reading orientation, not sideways or upside down. You can hold your phone vertically or horizontally as long as the resulting image is upright. Rotate any sideways image before submitting it for recognition.
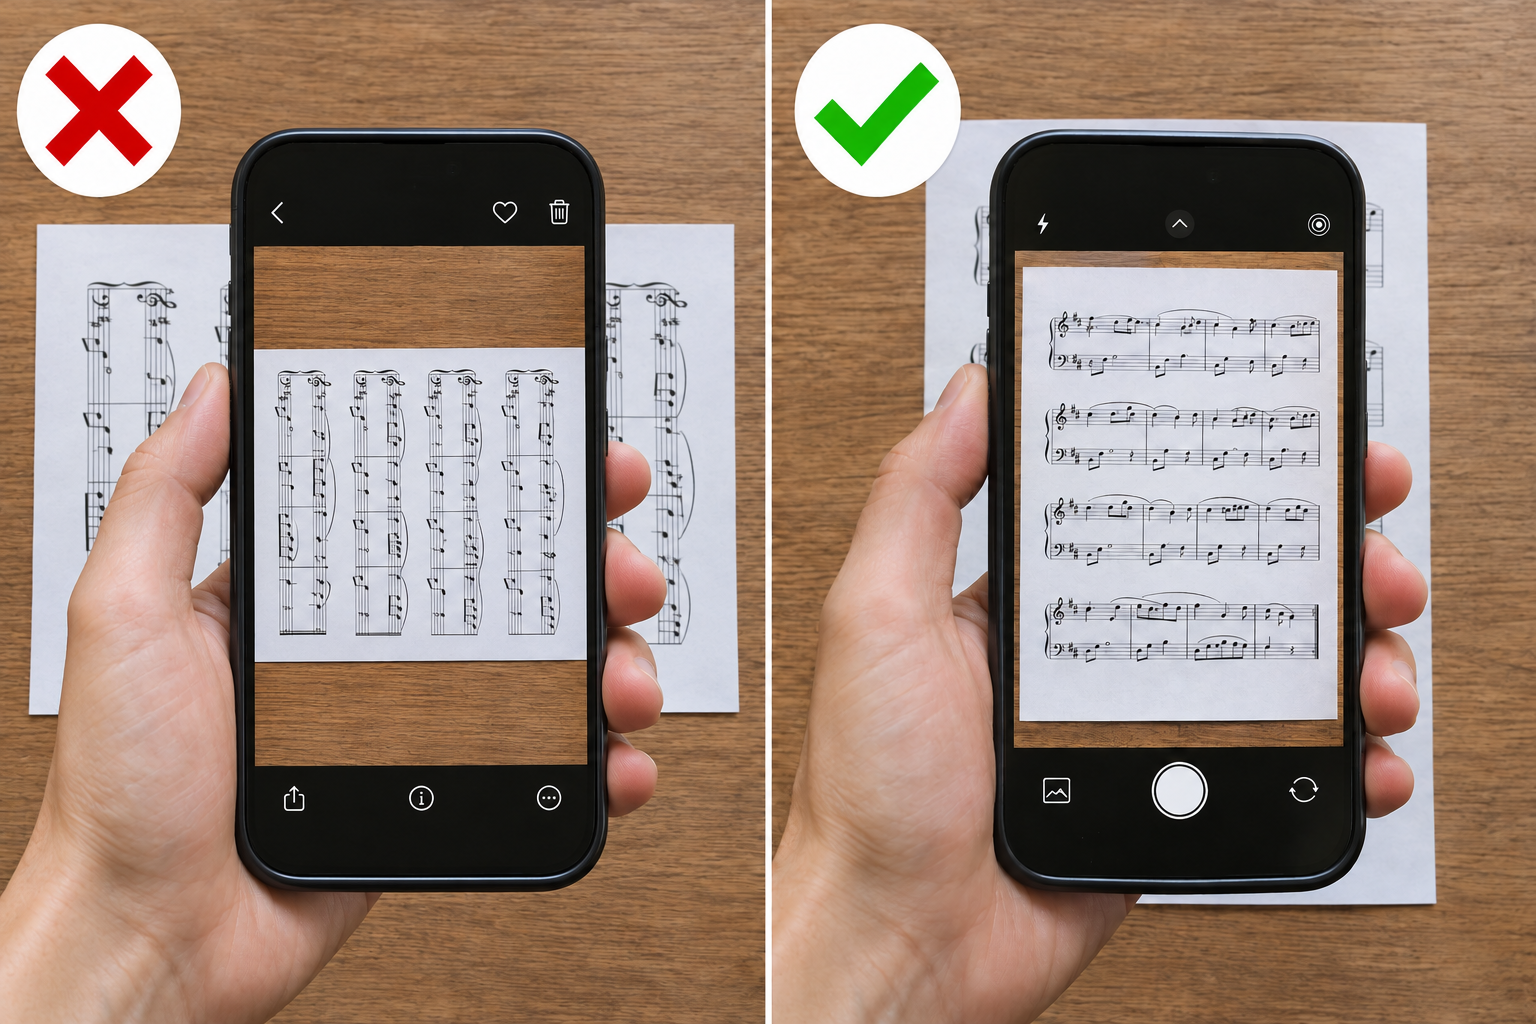
IncorrectThe score image is sideways, with vertical staff lines.CorrectThe score image is upright, with horizontal staff lines. Keep the paper flat
Smooth out folds and curled edges. For a bound book, gently flatten the page without hiding the music. A curved page near the spine can make staff lines and symbols harder to read.

IncorrectFolds and curves bend the staff lines.CorrectFlat paper with straight staff lines. Use soft, even lighting
Make sure the whole page is well lit. Move your phone or light if you see shadows from your hands or phone. Avoid direct flash or reflections that wash out parts of the score.

IncorrectShadows and glare hide musical symbols.CorrectEven lighting keeps all the music visible. Keep every detail sharp
Clean the camera lens, tap the music to focus and hold the phone steady. Zoom in on the preview: noteheads, beams, dots, rests, sharps and flats should remain distinguishable. Retake the photo if they look blurred or merged.

IncorrectBlur and camera shake merge musical details.CorrectSharp focus keeps small details distinct. Capture one complete page at a time
Photograph each page separately rather than an open two-page spread. Include all staves and measures, especially clefs, key signatures and time signatures at the left edge. Leave a small margin so the first and last notes are not cut off.

IncorrectTwo pages with music cut off at the edges.CorrectOne complete page with a small margin. Fill the frame with the page
Move close enough for the music to be readable while keeping the complete page in view. Avoid a large area of table or background around the paper. Prefer moving the phone closer over heavy digital zoom.

IncorrectToo much background makes the music tiny.CorrectThe complete page fills most of the frame. Keep the notation unobstructed
Keep fingers, clips and other objects away from the music. Where possible, use a copy without handwriting, highlighting or markings drawn over notes. Lyrics are normal in many scores; the concern is text or marks overlapping the notation.

IncorrectFingers and pen marks obscure the notation.CorrectClean, unobstructed musical notation. Use the original image
Import the original photo when possible. Small screenshots, images compressed by messaging apps and repeated resizing can lose musical details. Avoid strong filters, aggressive black-and-white conversion or sharpening that removes fine lines or creates extra marks.

IncorrectCompression loses detail and creates blocky edges.CorrectThe original image preserves fine details. Prefer a source file when available
If you have a MusicXML file, import it directly to avoid reading notes from a photo. Otherwise, use a clear PDF exported from notation software where available. A PDF containing a blurry scan still has the same image-quality limitations. Avoid photographing a computer or tablet screen.

IncorrectPhotographing a screen introduces glare and bands.CorrectImport MusicXML or a clear PDF directly. Review the pages and the result
Before processing, check each page for blur, missing edges, duplicates and correct order. Afterwards, listen and compare the result with your score before practising, especially where the rhythm or melody sounds unexpected.

IncorrectPages are out of order, duplicated and cropped.CorrectCheck complete pages, their order and the notes.
If the result does not match your score
Notes are missing or incorrect
Check the original image at the affected measure. Retake it if small symbols are blurred, covered, cropped or washed out. If you have a printed version or a clearer source file, try that instead.
A staff or part of the page is missing
Check that the entire page is visible, the paper is flat and the photo is straight. Make sure the music near the spine and along every edge is readable.
A clearer photo still gives the wrong result
Recognition can also struggle with handwriting or complex notation. Repeating the same upload may not help. If available, try a clearer printed score or import the original MusicXML file. Some scores may still not be fully recognized.
What to expect
Good image quality improves the chances of accurate recognition, but does not guarantee a perfect transcription. Complex scores with multiple voices, dense notation or unusual symbols may not be fully recognized even in a clear image. Pianora may still miss or misread notes and rhythms. These tips reduce common input problems; they do not mean every recognition error is caused by your photo.